
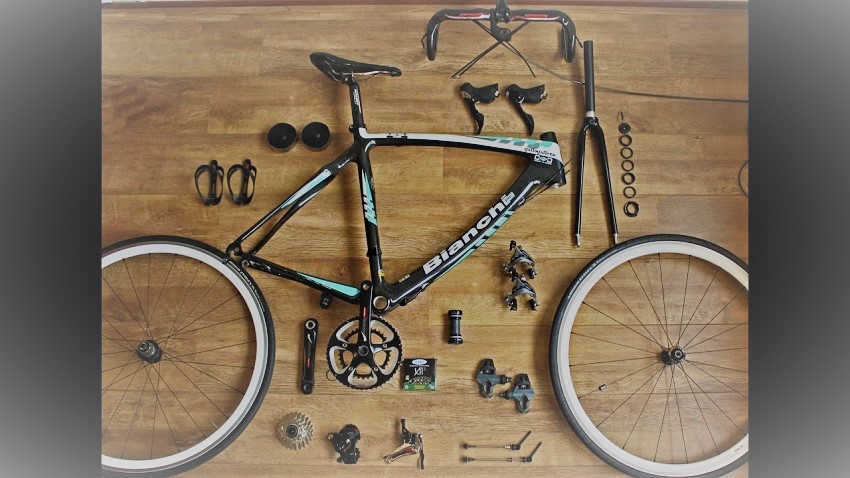
28 Feb How to assemble a bike?
Bicycles are the perfect mode of transport for short commutes and around-town trips. If you want to ride more, though, you’ll need a bike that can handle long distances, lots of hills, and rough terrain. A bike can be assembled in minutes, but it’s a lot harder than you think. To make it simple and easy to understand, we’ve presented the article to show you how to assemble a bike.
How to assemble a bike?
Step 1: Picking the right frame
Frame size is important when buying a bike like schwinn mountain bikes. The width of your leg means that it may not fit on every bicycle, so make sure that you get the correct one! When choosing an electric bike, you also need to think about how many gears are included and what type of pedals are fitted as these will have an impact on riding efficiency and cost less to run than ones with other types. However, if more accessories are to be purchased or you plan on doing any off-road riding, then lighter and more efficient models will prove the better choice in PVP bike reviews.
Step 2: Fit wheels and handlebars
Wheel size needs to match that of your frame as it isn’t weight-related like for road bikes, but rather some are required for the style of the bike. Larger tires (up to 20″) mean more rolling resistance because flatter tire areas will deflect more energy and have a lower gear ratio. For balance, you need to have the same amount of surface area covered by rim between the front and rear wheels, so take care when adjusting it that any front-wheel rotation with effect on the other is minimized (which can happen if skewer axle hits against spokes).
Step 3: Fitting the drivetrain & brakes
Make sure that you fit your gears, so they don’t pull out of gear. A good bike shop – such as those found in volunteer at most London train museums or The Thorpe park noticeboard outside to find one, can do this for you. Bear in mind when fitting pedals and brake levers – bicycle racing fittings are a lot tighter than normal, but these have dedicated machines that can shorten spindles if they’re too long. The freewheel is the most secure way to connect gears as it allows constant tension from the chain, which would normally derail at high speed.
Step 4: Fitting racks, bottle cages, and mudguards
Matt shows how to fit great fitting mudguards on his bike. You need both a front and a rear rack for anything like commuting or using the bike as a car. There are lots of different options from carrier motorcycle-style or well-equipped cycle touring panniers; they all take up more space than you might imagine, so consider what will fit and the weight you expect to carry when taking it out for all purposes. To mount, place the panniers together with a thin piece of cardboard nearby a sharp object – punch a hole in plastic or pin on metal so it can’t bend back. Fix rack to bike frame either by bolts directly through spindle holes or rivets (as shown).
Step 5: Fitting pedals and brake cables
Brake cable should terminate at frame; use a piece of double-sided tape to tidy it up. Due to the way they fit, the brake pads cause your pedal pivots to not move apart when pedaling, allowing you less chance of losing all forward momentum should your braking power fail (maybe if bent off-road or dropped). This isn’t always needed as bikes can be equipped with shock absorbers too, but I find them far better quality than anti-squat on-road MTB. You may also like to read, BMX Bike Maintenance Pro Guideline
Pedals are easy to set up with some trial and error in terms of what tire shape works best depending (roughly) on the direction you pedal. Think about this when you buy your pedals as different shapes can be more awkward or even unstable for differing riding conditions.
Step 6: Electronic cables, Plug, and play
Now for the easy bit! Unclip housing from Velcro pad on the seat post. Trim excess wires with careful wire snipping using a tool – a knife will slice nylon too quickly, making your task harder. Thread it through the hole and tighten the upper manufacturer’s recommendations or as snugly as possible to avoid wobbles caused by natural movement without twisting the nut so tight that parts brake on hit hard bumps.
Pros and cons of self-assembly of a bicycle
Disadvantages
Buying a finished bike, you know in advance what it looks like. You can “feel it,” sit on it and ride it for a while. If you assemble a bike yourself, you do it at your own risk, not knowing what kind of animal you will find yourself with;
Often you will have to go to the store for replacement parts. Even if you go through the entire internet beforehand and make a list of all the components you need, there’s little chance they are all available and even in one store. Let’s say more: it is unlikely that you yourself will be able to foresee all the parts necessary for assembly, down to the last screw. Therefore, be prepared for the fact that you will soon become a regular customer of bicycle parts stores, and sellers will recognize you during frequent visits;
You will waste a lot of time. In addition to the long shopping trips and even longer waits for the delivery of the parts you have ordered, you will also need a lot of time to assemble and study the instructions for high-quality fixing of the parts. We will try to help you a little by telling you later in this article how to assemble a bike.
Price. Oddly enough, buying a bicycle in practice turns out to be much cheaper than assembling.
Advantages
The most common reason people decide to take charge of assembling a bicycle is dissatisfaction with the available equipment. By assembling a bike yourself, you decide which manufacturer components to use and what you want to see in your bike.
Possibility of updating. Most bicycles are factory assembled and do not include any changes to the bicycle design in the future. With self-assembly, you can do it.
Full freedom of choice: what you want, then you bought it. They wanted to make the bike light – they bought the lightest parts. Disliked – they replaced them with something heavier and you drive for your pleasure. Keep reading How to wash an e-bike
Sorry, the comment form is closed at this time.